Workflow Demo Documentation
Two end-to-end automation workflows — from form submission to personalized email delivery — built with n8n, Resend, and custom routing logic.
Form → Welcome Email Demo
A customer fills a registration form and immediately receives a personalized welcome email.
- A customer fills a registration form and immediately receives a personalized welcome email.
- Tool used for email delivery: Resend (free tier — no Gmail required).
- Estimated setup time: 10–15 minutes.
- n8n instance running (cloud or self-hosted)
- A free Resend account — sign up at resend.com
- A working email inbox to receive the test welcome email
- Go to resend.com and click Sign Up — create a free account.
- After login, click API Keys in the left sidebar.
- Click “Create API Key” and give it a name (e.g.,
n8n-demo). - Copy the API key immediately — it is shown only once. Save it securely.
onboarding@resend.devThis is sufficient for demo purposes. No domain verification needed.
- Open your n8n instance → Click “New Workflow”.
- Give it a name: “Customer Welcome Email Demo”.
- Click “+” → Search “n8n Form Trigger” → Select it.
- Configure the following form fields:
| Field Name | Field Type |
|---|---|
| Full Name | Text |
| Phone (optional) | Text |
- Set Form Title to: “Customer Registration”.
- Click “Test Step” — n8n will generate a form URL. Copy and save this URL.
- Click “+” after the Form Trigger → Search “Resend” → Select it.
- “Create New Credential” → Paste your API Key from Step 1 → Save.
- Configure the Resend node with the following values:
| Field | Value to Enter |
|---|---|
| From | onboarding@resend.dev |
| To | {{ $json.email }} |
| Subject | Welcome to Our Service! |
| Email Type | HTML |
| Body | Paste HTML from Step 5 below |
Paste the following HTML into the Body field of the Resend node:
<h2>Welcome, {{ $json['Full Name'] }}! 🎉</h2>
<p>Thank you for registering with us.</p>
<p>We are excited to have you on board.</p>
<br/>
<p>Best Regards,<br/><strong>Your Company Team</strong></p>- Click “Test Workflow” in n8n (top right area).
- Open the Form URL (from Step 3) in a browser tab.
- Fill in all the form fields with test data and click Submit.
- Return to n8n — you should see green checkmarks on all nodes. ✅
- Check the email inbox — the welcome email should arrive within seconds. 📧
- Once the test is successful, toggle the “Active” switch at the top right.
- The workflow is now live and will run automatically on every form submission.
Workflow 1 — Summary Flow
| Node | Purpose |
|---|---|
| Form Trigger | Displays the registration form to the customer |
| Resend Node | Sends personalized welcome email to the customer |
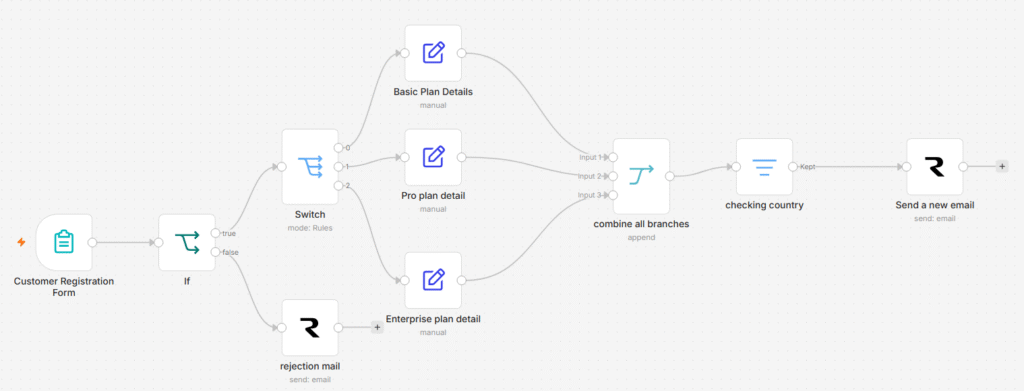
Customer Onboarding Workflow
Eligibility check, plan routing, country filtering, and personalized email delivery — all automated.
- A customer fills a detailed registration form.
- The system checks eligibility (age), routes by plan type (Basic / Pro / Enterprise).
- Filters restricted countries, and sends a fully personalized welcome email.
- Nodes used: Form Trigger, IF, Switch, Edit Fields (Set) ×3, Merge, Filter, Resend ×2.
| Node | Purpose |
|---|---|
| Form Trigger | Collects customer data (name, email, age, plan, country) |
| IF Node | Checks if customer age is 18 or above |
| Switch Node | Routes flow based on selected plan type |
| Edit Fields — Basic | Tags data with Basic plan details |
| Edit Fields — Pro | Tags data with Pro plan details |
| Edit Fields — Enterprise | Tags data with Enterprise plan details |
| Merge Node | Combines all 3 plan branches back into one flow |
| Filter Node | Blocks customers from restricted countries |
| Resend — Welcome | Sends personalized welcome email (eligible customers) |
| Resend — Rejection | Sends rejection email (under-18 customers) |
- n8n instance running (same as Workflow 1)
- Resend API Key already created (from Workflow 1 — reuse it)
Open the existing Form Trigger node and add the following new fields:
| Field Name | Field Type |
|---|---|
| Full Name | Text |
| Age | Number |
| Plan Type | Dropdown |
| Country | Text |
For the Plan Type dropdown, add these options:
- Basic
- Pro
- Enterprise
- Click “+” after Form Trigger → Search “IF” → Select it.
- Configure the condition as follows:
| Setting | Value |
|---|---|
| Value 1 | {{ $json.Age }} |
| Condition | Greater Than or Equal To |
| Value 2 | 18 |
This creates two output branches:
- TRUE branch → Customer is 18+ → proceed to Switch node
- FALSE branch → Customer is underage → send Rejection Email
On the FALSE branch — Add a Resend Node:
| Field | Value |
|---|---|
| From | onboarding@resend.dev |
| To | {{ $json.email }} |
| Subject | Registration Not Approved |
| Body (HTML) | <h2>Sorry, {{ $json['Full Name'] }}</h2><p>You must be 18 or older to register.</p> |
- Click “+” after IF (TRUE branch) → Search “Switch” → Select it.
- Set “Value” to:
{{ $json['Plan Type'] }} - Add 3 routing rules as follows:
| Rule | Condition | Value | Output |
|---|---|---|---|
| Rule 1 | Equal To | Basic | Output 1 |
| Rule 2 | Equal To | Pro | Output 2 |
| Rule 3 | Equal To | Enterprise | Output 3 |
Add one Edit Fields node after each Switch output. Search for Edit Fields (Set).
This ensures the original form data (Name, Email, Age etc.) is not lost.
🟢 Basic Plan — Output 1
🔵 Pro Plan — Output 2
🟣 Enterprise Plan — Output 3
- Click “+” → Search “Merge” → Select it.
- Set Mode to: “Append”.
- Connect all 3 Edit Fields node outputs into this single Merge node.
- The Merge node will combine all three branches into one flow.
- Click “+” after Merge → Search “Filter” → Select it.
- Configure the filter condition:
| Setting | Value |
|---|---|
| Value 1 | {{ $json.Country }} |
| Condition | Is Not Equal To |
| Value 2 | Restricted |
Only records that pass this filter will continue to the email node. For the demo, type Restricted in the Country field to test the block.
Country is not equal to Cuba OR Country is not equal to Iran etc.
- Click “+” after Filter → Search “Resend” → Select it.
- Use the existing Resend credential (already set up in Workflow 1).
- Configure the node:
| Field | Value |
|---|---|
| From | onboarding@resend.dev |
| To | {{ $json.email }} |
| Subject | Welcome to Our Service! 🎉 |
| Email Type | HTML |
Paste the following HTML into the Body field:
<h2>Welcome, {{ $json['Full Name'] }}! 🎉</h2>
<p>You have successfully registered for the
  <strong>{{ $json.plan_label }}</strong>.</p>

<table style='border-collapse:collapse; width:100%;'>
  <tr>
    <td style='padding:8px; border:1px solid #ddd;'><strong>Plan</strong></td>
    <td style='padding:8px; border:1px solid #ddd;'>{{ $json.plan_label }}</td>
  </tr>
  <tr>
    <td style='padding:8px; border:1px solid #ddd;'><strong>Support</strong></td>
    <td style='padding:8px; border:1px solid #ddd;'>{{ $json.support }}</td>
  </tr>
  <tr>
    <td style='padding:8px; border:1px solid #ddd;'><strong>Pricing</strong></td>
    <td style='padding:8px; border:1px solid #ddd;'>{{ $json.price }}</td>
  </tr>
</table>

<br/>
<p>We are thrilled to have you on board!</p>
<p>Best Regards,<br/><strong>Your Company Team</strong></p>Run the following 4 test scenarios to verify everything works:
| Test Case | Age | Plan | Country | Expected Result |
|---|---|---|---|---|
| Happy Path ✅ | 25 | Pro | India | Welcome Pro email received |
| Underage ❌ | 16 | Basic | India | Rejection email received |
| Enterprise ✅ | 30 | Enterprise | USA | Welcome Enterprise email received |
| Blocked Country ❌ | 28 | Pro | Restricted | Filtered out — no email sent |
- Once all 4 test scenarios pass successfully:
- Toggle the “Active” switch in the top right corner of n8n.
- The workflow is now live. ✅
Workflow 2 — Complete Node Sequence
| # | Node Name | Node Type | Purpose |
|---|---|---|---|
| 1 | Customer Registration | Form Trigger | Collects name, email, age, plan, country |
| 2 | Age Check | IF | Allows only age ≥ 18 to proceed |
| 3 | Plan Router | Switch | Routes to correct plan branch |
| 4 | Set Basic Details | Edit Fields | Adds plan_label, support, price for Basic |
| 5 | Set Pro Details | Edit Fields | Adds plan_label, support, price for Pro |
| 6 | Set Enterprise Details | Edit Fields | Adds plan_label, support, price for Enterprise |
| 7 | Combine Plans | Merge (Append) | Merges all 3 plan branches into one |
| 8 | Country Filter | Filter | Blocks customers from restricted countries |
| 9 | Send Welcome Email | Resend | Sends personalized email to eligible customers |
| 10 | Send Rejection Email | Resend | Sends rejection email to under-18 customers |